Saturday was a productive day for me: I spent eight hours working on the truck then rode my new bicycle for 16Km (10 miles). You probably don't care too much about the details of the bike ride, so let me tell you about my experience of working on the truck. I'd like to start out with some advise for others whom dabble in work on cars: If you can spend a few minutes getting stuff out of your way it will probably benefit you greatly the first time you do a job on a vehicle.
The first thing I did with my truck is set up a quick shade style canopy. This was my wife's idea, and a pretty good one at that. It made working out in the 100 degree Texas sun bearable.
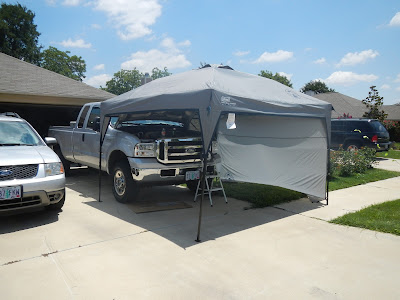 |
| The canopy was my wonderful wife's idea and made working on the truck as pleasant as it could be for working outside in a Texas Summer. |
The second bit of advise I have for someone, anyone doing really serious work on a vehicle for the first time, is document everything! It doesn't matter how you do it. In the past I've used a notebook, but recently I've learned of a cool new invention called the digital camera, granted it helps to have a friend to snap the pictures so you don't get slowed down too much.
 |
| A picture of the engine shortly after starting work on it notice the batteries are disconnected and a degas (aka coolant tank) is unbolted from it's normal location. |
Pictures that document specific connections can really help you out later, since they show all of the detail of color and size and most cameras number them in order, so reassembly is simply a matter of looking at the pics in reverse order.
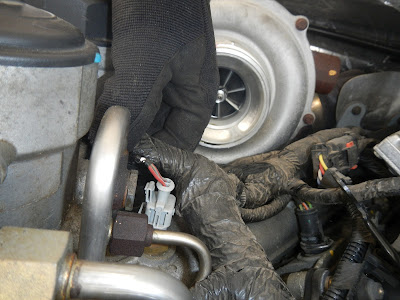 |
| An example of documenting with pictures, now I know the where that plug with the white/red wire goes :) |
The things I removed included: the batteries (most diesel trucks have at least two), the air filter assembly, both of the charge air cooler (
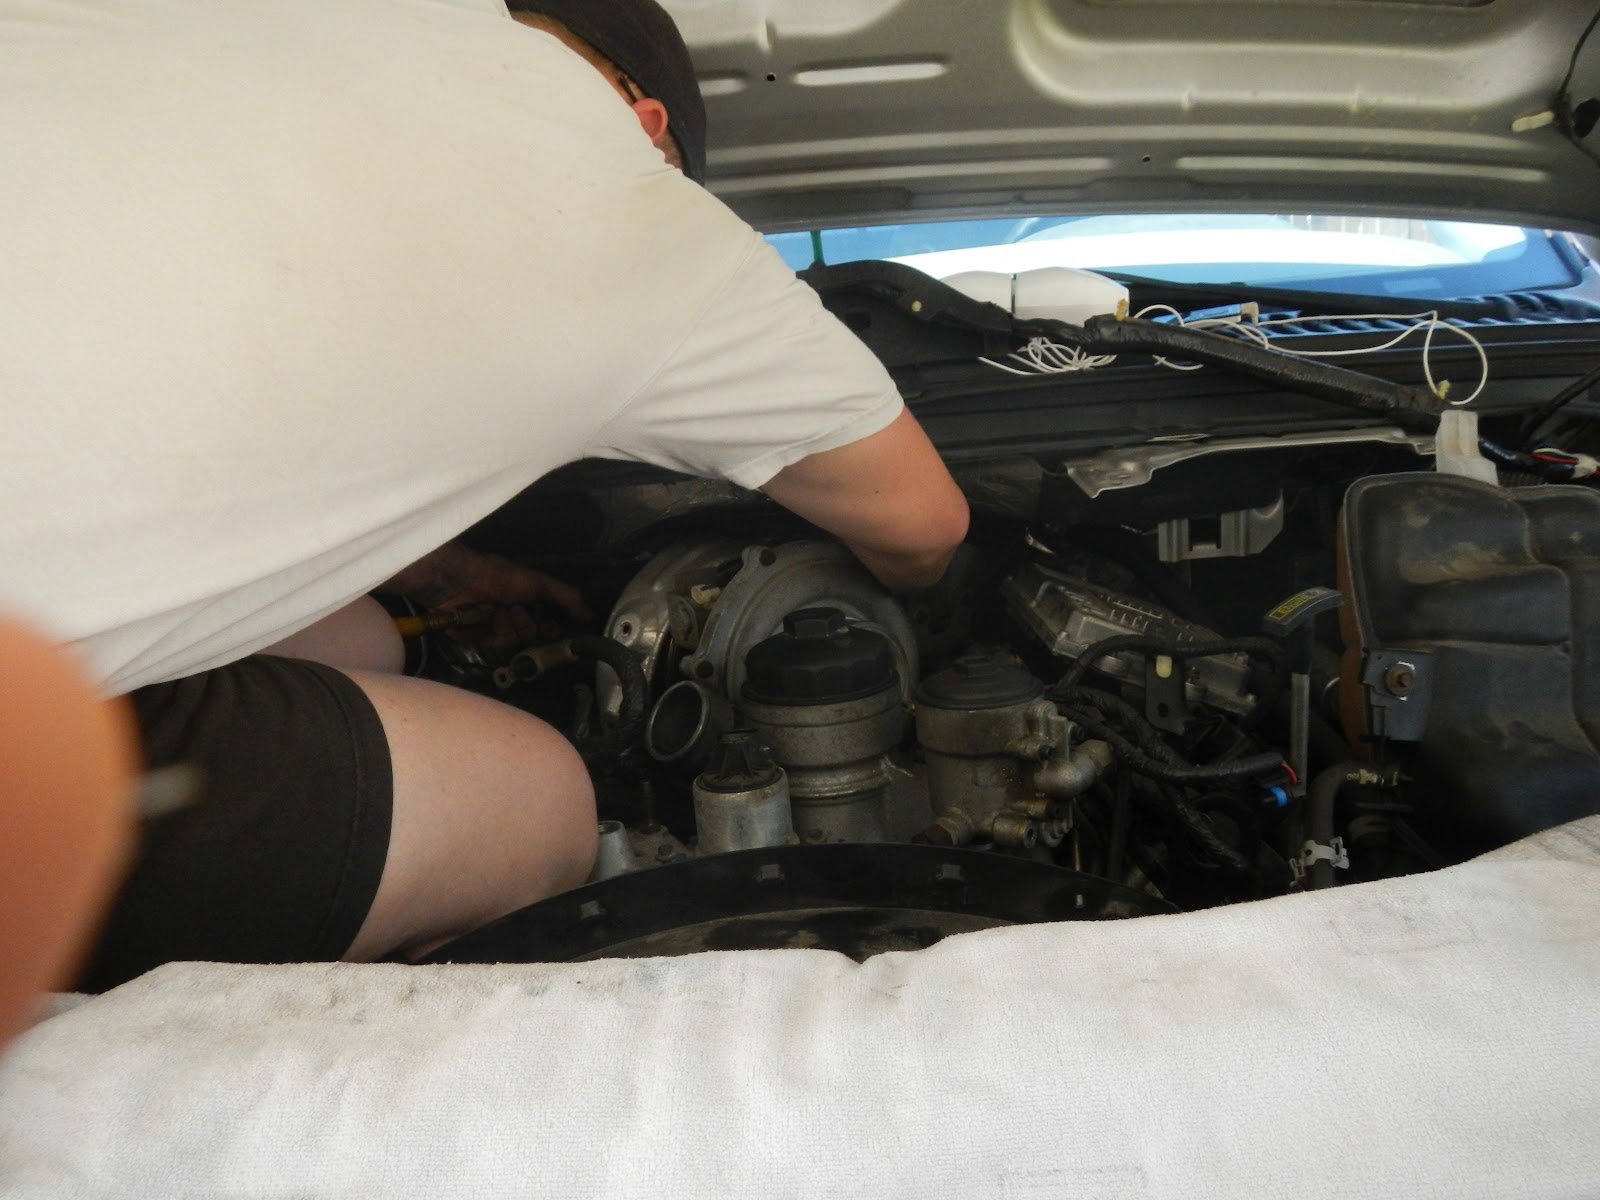
some people call it intercooler but that's a different story) tubes, the alternator, and as much of the fan shroud as possible. I personally really get into my work, literally. I'm flexible, and can get into tighter spaces than most mechanics. After removing the batteries from the truck I found the passenger side battery tray a suitable perch to work from.
 |
| This picture is courtesy of my 8 yr old daughter "Monster". I didn't know she was taking it, but it shows off how in, literally and figuratively, to my work I get. |
What can I say about all the work... I guess I owe a big shout out to
srmastertech on youtube. He has some fantastic videos and a wealth of experience working on late model Fords. After watching his videos the only thing that I had trouble with was the fact that there was a third bolt holding down my turbo from the back. Many references mention removing the back bolt then the front bolt which implies just two bolts. I found two bolts oriented horizontally going through the turbo pedestal onto the exhaust side
volute. Then I started prying up on the turbo to un-seat it from the pedestal and oil drain tube. I spent 45 minutes and a great deal of energy on this until I happened to notice a third bolt oriented vertically almost directly under the exhaust side outlet of the turbo. Obviously, once this bolt was removed the turbo came out with almost no fuss at all.
 |
| After much prying and a few choice words, there it is, my turbo. I wish I was pulling it to upgrade it. But if that time comes, I'll know what to do. |
Once the turbo was out of the truck, I was able to do a little bit of investigation. If you aren't spun up on why I was doing all of this, let me bring you
up to speed. I used my truck to tow my friends Camaro. Plenty of starts and stops, even hopped a curb to help someone jump-start their dead battery, you know a typical day in the life of a truck. The whole day the truck ran like a charm--no trouble at all. I parked it in my driveway late that night after a decent days work. The next morning, when I tried to drive to the store, the engine cranked, but it wouldn't start. No fire at all. The best way to explain it is trying to start a gasoline engine with a brand new battery and no fuel in it at all.
I spent a day ruling out things like fuses, relays, and wire damage--to no avail. Next I went to the internet to learn about the wealth of faults that the 6.0 Power Stroke engine has (hence my previous blog entry). Let me give you a rundown of how these trucks work. Older style diesels (the first generation of 5.9 Cummins found in Dodge trucks and the 6.2/6.5 Detroit Diesel made V8 engines found in the '80s Chevrolet and GMC trucks used mechanical fuel injection pumps. Diesel engines require the fuel to be injected into the engine at a rather high pressure, typically the minimum is about 2,000 PSI (the higher the better for increased power, quieter operation and less smoke out the exhaust). The mechanical pumps in these engines did several jobs. First they were almost like a distributor used for spark plugs in that they routed the fuel to each cylinder at the right time, and in the right amount. Second they throttled the engine. Gas engines are throttled (varied in speed, you know with a gas pedal, etc) by how much air you let into the intake of the engine, fuel volume is controlled to match the volume of air flow. Diesel engines run with wide open air flow, instead they are throttled by how much fuel is injected into the engine. The third job those mechanical pumps had was to shut off the fuel when you turned the key off, thus shutting the engine off.
Those 5.9 Cummins, 6.2/6.5 Detroits and the International Harvester made 6.9 and (pre-Power Stroke) 7.3 were very reliable engines, and simpler to keep running than any gas engine in any vehicle. The only shortcoming(s) were power output and (to some) their dirty exhaust. The new diesels today easily make more power than a supercar and can do it while hauling almost anything including the kitchen sink. The original 7.3 Power Stroke was the first to hit the market with a computer controlled injection system which made increasing power as easy as "chipping" or re-tuning any modern fuel injected gas powered car. GM soldiered on with it's 6.5 until it got the respectable Duramax in 2001, The Duramax (designed in colaboration with Isuzu) was ahead of the game with using a common rail injection system. Dodge stayed the course with it's mechanically injected 5.9 Cummins until the 5.9 joined the 6.6 Durmax in the world of common rails, this was driven by the aforementioned increased emissions regulations. Ford, and it's partner International, went a whole new route, they started with a clean sheet design, this resulted in the 6.0 Power Stroke.
Now the general mechanics of the engine is fine. It's very rare that any one ever has a problem with the bottom end. Most of the common problems on these engines involve components and methods that that differ from the Duramax and Cummins engines. Namely the method that the fuel injection functions. The Duramax and Cummins engines use an expensive pump to pressurize fuel up to the thousands of PSI that is needed for proper injections, the injectors are relatively simply yet expensive to build valves that open and close at the right time to induce fuel to the engine. The method used on 7.3 and 6.0 Power Strokes involve a High Pressure Oil Pump (HPOP) and very complicated, yet easier to manufacture Hydraulic Electronic Unit Injectors (HEUI). Like all engines the Power Strokes use a typical "low pressure" oil pump which lubricates the engine and operates between 10-60 PSI. This regular oil pump also feeds the HPOP which can squeeze oil to pressures in excess of 500 PSI.
Fuel is pumped to the engine and eventually the injectors at about 50-60 PSI, which is similar to where gas engines need there fuel pressure at. The fuel is routed to a chamber near the tip of the injector. The electronically operated valve at the top of the injector opens to let high pressure oil in to a chamber and is allowed to press down on a piston within the injector. This oil-chamber piston is larger in diameter than the fuel-chamber piston and allows a multiplication of force. 500 PSI on the oil side turns to more than 2,000 PSI on the fuel side.
With all of that out of the way, what I've learned is that my truck is not getting enough pressure from the HPOP. The high pressure oil system has two critical components besides the pump. These are the Injection Pressure Regulator (IPR) and the Injection Pressure Sensor (IPS). The IPR is an electronic valve which the computer uses to regulate the oil pressure going to the injectors. The IPS is how the computer tracks the oil pressure and it's signal, in turn, affects what the computer will do with the IPR. Throughout the high pressure oil system there are several seals, gaskets and plugs that are known to have problems on the 6.0. Over time they were upgraded and re-engineered. In short the materials originally used were not up to par with the technology they were supporting.
My truck was only building about 300 PSI of pressure from the HPOP. There are several components that, when failing, will result in almost no oil pressure. Since I'm getting a few hundred PSI, I believe the major components are operating properly, and that I have a leak some where. The good news is that a seal or o-ring is cheaper than any of the major components, the bad news is there are lots of o-rings and seals in this system. And finding the failing seal(s) is a hunt in every essence of the word.
My truck is partially torn apart and I haven't gotten to the
problem(s) yet. But I made a lot of head-way in the effort to fix it.
This story will continue in future posts but for now I will leave you
with a few pictures of my little adventure. Thanks for reading, please
feel free to comment!
 |
| A picture of your Author, just in case you wondered. |
 |
| Yes that's a lug wrench, I didn't have a proper pry bar at the time. A problem I just resolved. |
 |
| A 6.0 Power Stroke sans Turbocharger (as well as the alternator and a few other things). |
 |
| In addition to the no start problem, I've also had very minor oil leak. I think the orange hose in the bottom of this picture is the culprit. Notice the oil stain on that white bar-code sticker is starting at the bottom and going up. |
 |
| This is the housing for my oil filter. I'm a little concerned that it was so empty. Unfortunately, I don't know enough about this engine to know if this is normal. On the left side of the picture, you can again see a mess of oil. The cylindrical object on the right with the black connector is my EGR valve. |
 |
| Here is a close up of the EGR valve. Yes, this soot is going back into the engine. I'm not sure what I'm going to do about this yet... |
 |
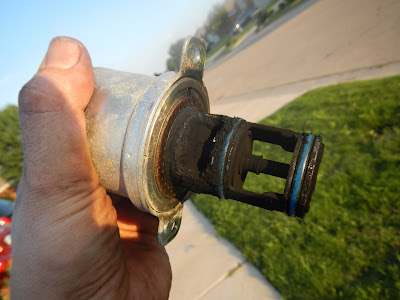
| The intake side of my IPR showing the filter screen, I would have preferred to not see the few little specs on the filter-screen, but compared to some of the IPRs I've seen on these trucks, I'm considering my self lucky. More debris on this screen could imply a failing HPOP, which is a very expensive part. |